Thursday, August 24, 2017

How To Choose The Right Foundation?

Dulu i pun ada masalah macam mana nak choose foundation yg sesuai maklum lah tak pernah ada foundation. My first ever foundation is Maybelline Fit Me. If you want to read the entry, click here!

So, for today's entry, i'm going to share with you guys 3 tips on how to choose the right foundation.


#1 Skin type

The most important thing you have to know what are your skin type is. How to know your skin type.
Read here : Know Your Skin Type.


DRY SKIN

If you have a dry skin, make sure on the bottle of foundation do stated these words :

- Illuminating
- Moisture
- Aqua
- Satin
- Dewy

But, if you have an oily skin, please do avoid those words up there.


OILY SKIN

For oily skin, look for the foundation that have these words :

- Matte
- Oil-free
- Magnifying
- Shine-free


#2 Type of foundation


Liquid - Suitable for all type of skin
Powder - For oily skin only.
Cream - Only for dry skin because if you have an oily skin, it will make your foundation become more shiny or greasy.
Stick - Only for oily skin because if you have a dry skin and you wear stick foundation, it will just make your foundation cakey. 

p/s : For dry skin, please use a less powder on your face because you don't want end up with a lot of dry patches on your skin right?


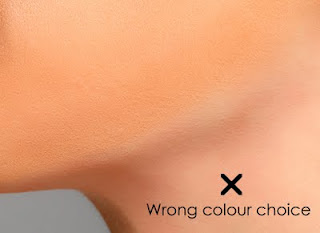
#3 Foundation shade


*from Google


*from Google


*from Google


If that foundation is oxidized, make sure choose a shade that one or two shade lighter than your original skin colour.


That's all. Thanks for reading!


Disclaimer : I'm not a professional so i'm just sharing a basic knowledge that i know.

Tuesday, August 22, 2017

Know Your Skin Type

Penting untuk kita tahu skin type kita before guna any skincare or makeup products. Sebabnya, kalau kita pakai taram je guna, it may damage/irritant or make your skin jadi tak cantik bila pakai foundation khususnya contohnya macam patchy lah greasy lah.

So here i nak share macam mana nak tau skin type kita.


p/s : Nose and forehead are naturally little oily, so if you rasa ada sikit-sikit oily dekat bahagian tu means that you're still a normal skin type bukan oily lagi. 

Blotting paper?
Dalam gambar tu contoh blotting paper, banyak je lagi jenama lain macam Tarte, Nyx, Sephora. Boleh beli dekat drugstore pun banyak je jual kalau jenama high end of course lah kena cari dekat kedai dia sendiri.


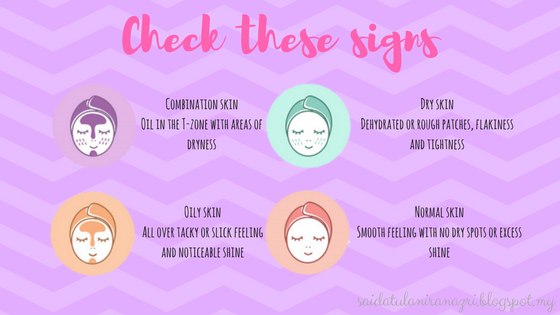
After dah siap 4 steps dekat atas tu, check these signs pulak.


So bila dah tau skin type kita, baru lah boleh beli any skincare or makeup product based on skin type kita. Takde lah nanti membazir tersalah beli.


That's all, thanks for reading!

Friday, August 18, 2017

Weekend Getaway to Melaka

Hi everyone!

Entry kali ni just nak share story 3 bulan lepas haha sebab rasa macam nak menulis. Okay let's jump into the story.

Bertolak lebih kurang pukul 8 dari Bangi. It only took like 1 hour to arrive at Melaka. Our first destination was at Freeport A'Famosa Outlet or lebih dikenali sebagai Melaka Premium Outlet yang terletak dekat Alor Gajah, Melaka.


Melaka Premium Outlet

*from Google

Actually i was amazed with the design of the buildings sebab tu rasa nak pergi sini nak tangkap gambar banyak-banyak tapi tah kenapa bila dah sampai takde pulak tangkap gambar bangunan cantik-cantik ni. #rugi

*from Google


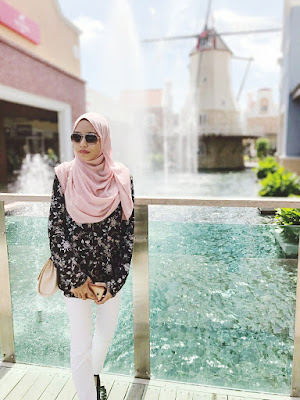
Tipu lah kalau pergi sini tak tangkap gambar ber-background "kincir angin" ni kan.


View from "kincir angin" thingy.


Asam Pedas Claypot

*from Google

After dah puas dekat Freeport, waktu tu macam ngam-ngam la lunch hour so we went to Asam Pedas Claypot yang terletak betul-betul dekat Bandaraya Melaka. I ordered Nasi putih + Asam Pedas Ayam kot. Memang sedappp sampai sekarang teringin nak makan lagi. 


Masjid Kampung Hulu

*from Google

Lepas dah makan, kami decide nak pergi solat Zohor dulu (buat jamak takdim). So we went to Masjid Kampung Hulu. Masjid ni dari luar nampak unik dan lawa. Tapi satu je, panasssss. Sampai kena buat makeup dalam kereta lah haha.


Kota A'Famosa & St. Paul Church


After solat, kami bergerak ke destinasi seterusnya ke Kota A'Famosa. Tapi parking takde pulak last-last masuk parking dekat Dataran Pahlawan Megamall baru jumpa parking. Nak pergi Kota A'Famosa memang ada jalan dalam mall tu so okay la rasa aircond jugak walaupun kejap haha. Ayy Melaka panas you know haha. 


*from Google

Nak pergi St Paul Church tu kena naik tangga ni sebab ada atas bukit betul-betul belakang Kota A'Famosa kat bawah tu.

*from Google


Dah puas tangkap gambar, panjat tangga tinggi-tinggi tu, kami bergerak ke destinasi seterusnya iaitu ke Pantai Klebang! Before tu kami pusing-pusing bandaray Melaka dulu. Alah Melaka kecik je pusing-pusing tempat yang sama jugak. After that, kami singgah pergi beli Coconut Shake dulu pastu pi minum kat pantai.


Pantai Klebang


Waktu ni petang angin pun sepoi-sepoi memang best lah.


Padang Pasir Klebang


Okay next destination ni tak plan pun tapi alang-alang dah sampai situ pergi je lah. Yes, Padang Pasir Klebang yang selalu orang pergi tangkap gambar tu.
Actually, kami taktau kat mana lepas tu gigih Google and rupanya tempat tu memang agak tersorok sikit. Nasib baik dapat cari jugak.
Tapi nak sampai ke tempat berpasir tu kemain jauh kena jalan kaki. Sampai-sampai sana memang lencun haha.


Mee Besen Ori Melaka

*from Google

Then, proceed to our last destination which is tempat dinner kami, Mee Besen Ori Melaka (sebelum tu, kami pergi solat maghrib dulu dekat satu masjid ni lupa pulak apa nama). Sampai-sampai sini tengok kena tunggu turn sebab ramai gila orang. Kena isi nama dekat satu buku then duduk dulu nanti kalau turn kita dia akan panggil nama.

Nak tau tak kenapa dipanggil Mee Besen? Sebab semua hidangan dia serve dalam kuantiti yang besar. Tapi jangan risau kalau korang tak ramai boleh order ikut saiz.

Saiz S : RM6 (1-2 orang)
Saiz M : RM10 (2-3 orang)
Saiz L : RM15 (3-4 orang)

Lepas dah kenyang, kami pun bergerak balik ke Bangi. So, itu saja weekend getaway kita. Tak overnight pun sebab tak jauh kan boleh pergi balik hari yang sama je.


Banyak lagi tempat menarik yang lain kami tak pergi. Setakat ni, tu je lah sebab kami pergi sehari je tak cukup nak pergi semua tempat kan.

Semua tempat yang kami pergi ni, semuanya plan. Yes kami plan sebab taknak lah nanti dah sampai sana takde arah tujuan last-last buang masa.

Tempat makan sedap-sedap pun kami search dulu before pergi. Sedap ke tak, harga dia apa semua la.


That's all from me. Thankyou for reading!
Thursday, August 17, 2017

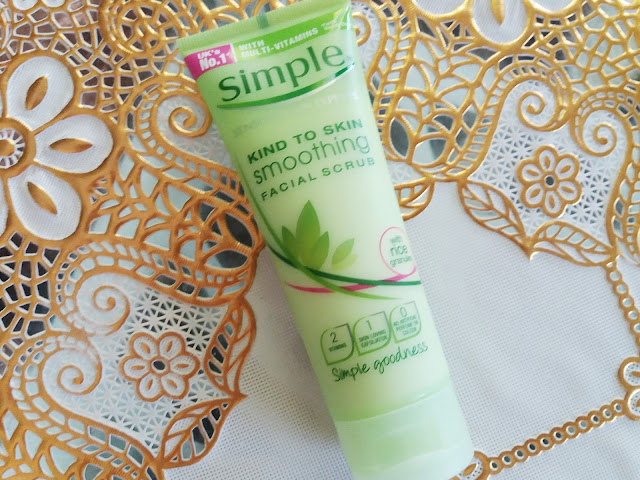
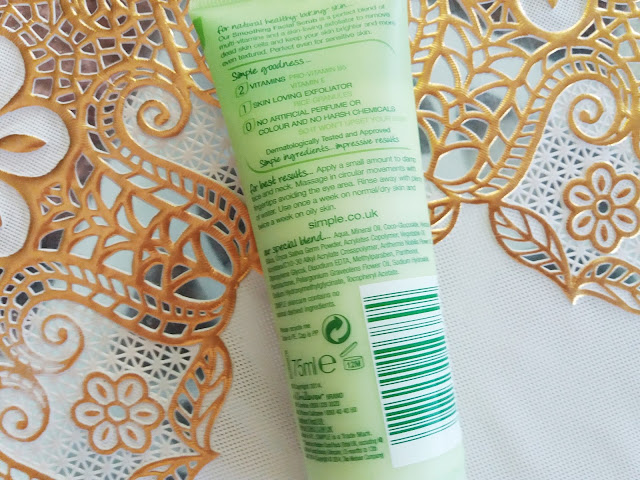
Simple Kind To Skin Smoothing Facial Scrub

Assalamualaikum and hi everyone!

Scrub is for removal of dead skin cells from the body and impurities, leaving you feeling fresh and your skin looking rejuvenated and revitalized. So for today's entry, i'm going to give a quick review about a facial scrub that i'm currently using. 


Product name : Simple Kind To Skin Smoothing Facial Scrub
Product type : Scrub and exfoliator
Price : RM22
Size : 75 ml
Where to buy : Watsons and Guardian


What it claims?
Our Smoothing Facial Scrub gently lifts dry, dead skin cells to help your skin look brighter and more even textured, plus it's a perfect blend of our purest possible skin loving ingredients with added vitamins.


Color/texture :
White creamy texture with granules.

Scent :
Okay je takde bau yang pelik-pelik pun.


How to apply?

1. Apply a small amount to damp face and neck.
2. Massage in circular motion with fingertips.
3. Avoid eye area.
4. Wait for about 10-15 minutes.
5. Rinse off with a plenty of water.

For normal / dry skin, use one a week while for oily skin use it twice a week.


My thoughts :

Sebenarnya ada banyak lagi scrub lain yang bagus-bagus contohnya macam St. Ives tapi i don't know why i macam takut nak guna yang tu walaupun banyak review kata best tapi ada jugak cakap cause breakout semua. So disebabkan tu i beli Simple ni.

 My skin setiap kali after pakai scrub ni serious lembut, smooth sangat. And i must say yang i tak menyesal langsung beli ni. Simple ni satu produk drugstore yang i think quite good tau. First product Simple i pakai ialah dia punya facial wipes, boleh baca sini : My Favorite Makeup Removers

I pakai scrub ni once a week. So far i dah pakai 4 kali means 4 minggu dah. Okay before i pakai scrub ni, i have like one tiny bump which i think clog pores dekat dahi ni lama jugak lah sebulan lebih. And after 2 kali i pakai scrub ni my tiny bump tu hilang tau. I don't know sama ada memang scrub ni yang membuatkan tiny bump tu hilang or memang dah sampai masanya dia nak hilang hahah.


Pros :
- No animal derived ingredients.
- No artificial perfume / color
- No harsh chemicals
- Gentle but effective
- Uses rice for exfoliation rather than microbeads that are so harmful to the environment.
- Perfect even for sensitive skin
- Affordable price

Cons :
- It's just like a basic scrub so for people yang memang suka gila guna scrub, this is not for you sebab ada banyak lagi scrub lain yang lebih best.


Bottom line :
Yes, i would recommend this especially for people yang ada sensitive skin and nak gentle scrub.

That's all, thanks for reading!

Friday, August 11, 2017

How I Choose My Skincare or Makeup Product

Assalamualaikum & hi everyone!

If nak beli something, mesti kita nak sesuatu yang berbaloi bila kita beli kan? So if nak sesuatu yang worth to buy of course kena ada cara tersendiri. Same goes like if we want to buy any skincare or makeup. 

So dekat sini, I nak share cara nak beli sesuatu skincare or makeup product supaya kita tak menyesal bila beli. 

Apa maksud menyesal dekat sini? Maksudnya bila kita main redah je beli nanti mula la ada produk yang tak sesuai dengan muka kita or kulit kita sampai breakout disebabkan sensitive or allergic dengan ingredients dalam produk tu lepas tu menyesal.

Firstly, buat "wishlist" sendiri untuk senaraikan produk yang korang nak tu macam ni : 


Apa yang perlu ada dalam tu? 

Depends on korang nak letak apa-apa info pun boleh. Macam I letak jenis produk, nama produk, harga, and after dah buat research I akan tulis review or comment of each product.

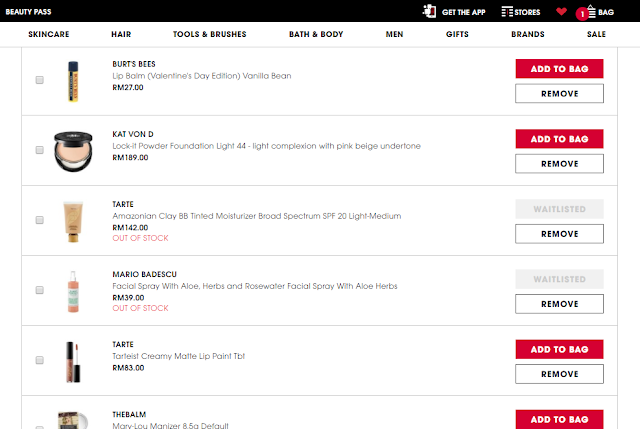
Or boleh jugak letak dekat "wishlist" website korang macam ni :


Ini Sephora and Hermo punya wishlist. Bila dah ada wishlist ni nanti korang boleh refer kat sini bila nak buat research lepas tu mana yang korang rasa taknak boleh terus remove dari wishlist ni and tinggal la yang okay je so boleh terus beli!

Semua ni of course memerlukan kerajinan. Do research! Kalau nak  tahu macam mana nak check ingredients dalam produk tu boleh baca kat sini : How to read CoSDNA


Kenapa kena buat research before beli?

Okay selain daripada nak avoid daripada breakout etc, dengan buat research korang jugak boleh compare harga. 
Contohnya, Hermo jual produk A RM80 and ada 20% off while Sephora jual RM75 tapi takde off.
Kat situ dah boleh nampak mana lagi berbaloi bila beli kan. 
So, itu la pentingnya untuk korang buat research terperinci if nak beli sesuatu especially on skincare and makeup. 


After dah beli, penting untuk korang patch test dulu before terus apply semua dekat muka. 


Dalam banyak-banyak patch area tu, I suggest untuk korang try neck because it is also a sensitive area like your face and is as prone to skin reactions as your face – but of course it’s not quite so visible. 

After buat skin patch test and your skin is okay, then you're good to go. That's mean your face can adapt with the ingredients of that product.


I think that's all. Thanks for reading!


Disclaimer - Please bear in mind though that just because you’ve never had a reaction to a product before it does not mean that it will never happen in future!

Tuesday, August 8, 2017

How to read CoSDNA?

Assalamualaikum and hi everyone! 

Do you ever heard about CoSDNA? 

CoSDNA ni ialah satu website yang kita boleh check any ingredients of our cosmetic product sama ada selamat ke tak untuk guna.

This website is very useful especially bila korang nak buat research on a product before buy something. 

It is very important to do research before you buy any product especially on skincare! Bila main hentam je pakai before research itulah punca breakout etc. Sebab taktau apa ingredient dalam product tu and boleh tak skin type kita kena dengan that ingredient. 

Contohnya macam sensitive skin, avoid alcohol so bila nak beli product tu tengok lah ada tak alcohol dalam ingredient tu. Kalau ada, try cari lain. 

Okay let's proceed,

Contohnya :

Kita boleh tengok ingredient apa yang ada dalam product tu and what is the function of each ingredients.
Selain tu, kita jugak boleh tengok the value of acne, irritant and also safety of each ingredient kalau kita pakai. 

Okay itu lah tujuan entry kali ni, nak read the value of that 3 things i stated just now. It's not difficult pun to analyse tapi saja nak bagitau jugak in case ada yang tak paham.


Based on this picture, take a look at ingredient Isopropyl Myristate.

For acne section - 5. It's a high value because the value of acne and irritant section is from 0~5. I have read a review from one user that said, she breakout horribly after using ingredient that contain acne value 5. So please avoid it.

For irritant, the value is 3 and we can say that it still can have a chance to irritant your skin. 

For safety, the value is 1. Safety index value can be from 1~9, the lower number means this ingredient is low hazard. So that's mean 1 is okay and we can say the ingredient is very safe to use for a long term usage.  


Take a look at ingredient named Methylisothiazolinone. 

The value of safety is quite high which is 7. So try to avoid it because it may be not safe for a long term usage.

If any the three column is blank, this means there is no data (not indicate the ingredient is safe or unsafe).


I hope this entry is helpful for you to do research when you want to buy any skincare or cosmetic products. That's all, thankyou :)


#Disclaimer - The skin condition of each person are different (even constantly changing) so tak semestinya apa yang CoSDNA ni bagitau memang akan terjadi. It depends on our skin.